Your Trusted eSignature solution
Big on Features, Low on Cost
Effortless Document Signing
Send documents securely with full legal compliance in just a few clicks.
Seamless Integration
Quickly integrate with your existing applications or IT systems using our user-friendly API and SDKs.
All-Inclusive Features
No extra charges—get advanced capabilities by default.
🎉 Enjoy 5 free signatures every month!
Try IgniSign for Free
See Pricing
No subscription / No commitment
Pay as you go - from 0.15 € / signature
No credit card required

Qcert for eSign -
QTimestamp
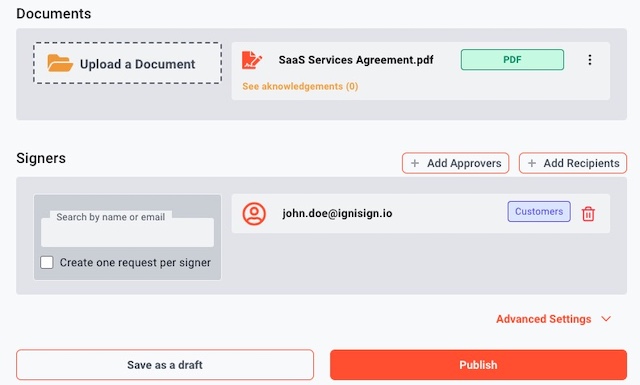
Easily send documents to sign
Send documents directly from our web application
Send documents to sign in seconds, and track the progress
No document preparation needed
Our binder technology simplifies the process - just upload and send your document
Multiple signers
Send documents to as many signers as you want
Multiple documents
Send as many documents as you want
Track the progress of the signature
See who signed the document, and when
Bulk signing
Send documents to multiple signers at once
Add approvers
who counter-sign the document
Add recipients
who will receive the document when signed
Schedule signature
Send documents to sign at a specific date and time
Configure reminders
Send reminders to signers
Start signing now

Integrate with your application or IT system
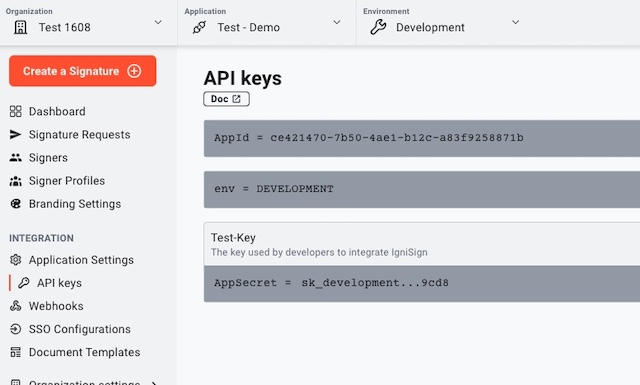
User Friendly API and SDKs
In average, it takes less than 2 days to integrate IgniSign into your application
Powerful API
Enable effortless eSignature integration with any website, CRM, or custom app. Control every aspect of the signature process.
Integrate into your application
Use our Front-end SDKs to embed the signature process in your application
Let us manage the signature process for you
Avoid the hassle of managing the signature process if you don't want to
White Labeling
Customize the signature process to match your branding
Multi-tenant
Keep the control of your data, and your users
3 environments
Development, Testing and Production
Webhooks
Get notified when a document is signed
Visit the developer center

Use Enterprise Grade Features
without subscription
Define the signature level of assurance
Simple electronic signature, Advanced digital signature or Qualified digital signature
Nominative certificates
The certificate is issued by us, as a Offical Trusted Certificate Authority
Adobe green check
All our signatures are Green-Verified by Adobe
Fully internationalised
Available in 36 languages
Sign any type of documents
Not only PDF, but also images, text, data, etc.
Manage employees, partners and customers
Configure in a fine way your signer profiles
Link IgniSign with SSO
Use your own authentication system, or integrate these from your partners
5 identification methods
For advanced and qualified signatures
4 authentication methods
For recurring signatures
Signature processed in an HSM
All our signatures are processed in an HSM, with the highest security level
Emit corporate e-Seals
To prove the origin of important corporate documents
Associate your critical logs to a qualified timestamp
To match your compliance requirements
Discover all IgniSign features
Pay as you go
no subscription required
Pay for What You Use
No hidden fees or surprises
No commitment
Cancel anytime
Pay as you go
Only pay for the services you use
Hassle-Free Start
No credit card required to begin
Quick Setup
Create an account online in less than 2 minutes
All features available
No need to pay extra for additional features
🎉 Enjoy 5 free signatures per month
This offer is forever available to everyone, whether for corporate or personal use.
API Access Made Easy
You can use our API without a subscription, commitment-free.
Email
Signatures
Simple Electronic Signature
5 monthly free then
0.15 €
per signature
Email + SMS
Signatures
Advanced Electronic Signature
0.15 €
per signature
+ the cost of SMS
Identity Check
Signatures
Advanced or Qualified
Digital Signature
0.30 €
per signature
+ Auth / Identification price
Free Development & Staging
For API users, signatures in development and staging environments are free—because testing is crucial before adoption.
See detailled pricing
Why you should choose IgniSign ?
Secure & Legally Binding
Certified
Secured by an HSM
Fully Featured
All included by default
Cost Effective
No upfront costs
Starting at 0.15 € / Signature
Try
IgniSign
For Free
Easy Integration
Made to be integrated into your application
Customizable
The Signature solution tailored to your needs
Under control
Keep control of your signature process